Textile and Lift
One way Lift makes developing applications fun, is by taking care of security for you. Most of the time, you don’t have to worry about common hacking attacks like XSS, this is because Lift doesn’t treat your data as plain Strings, it treats them as NodeSeq. Instead of displaying html tags, it will html encode them, before returning them the browser.
This happens without you having to enable anything, which is great, so you just focus on your application logic.
But not all is great, well, it is, but it takes some time to get used to. Sooner or later on your career, you are confronted with the task of giving your users access to add html content to your application.
Most people want to use some a wysiwyg editor, but Lift will encode the raw html, so this option does not work. There is a way to disable it, but it means opening your application up to attackers. And nobody wants that.
##what can we use then?
You can use things like a textile or markdown editor. They give you a pretty simple syntax to learn, and you can rest assure that your application is still safe. There are some jQuery plugins out there that help you, if you don’t want to learn the new syntax.
Lift comes with a Textile parser, and David is working on a Markdown parser.
In this post I’ll show you how you can use the Textile parser to offer your users a rich text editor, without sacrificing security.
How does it work?
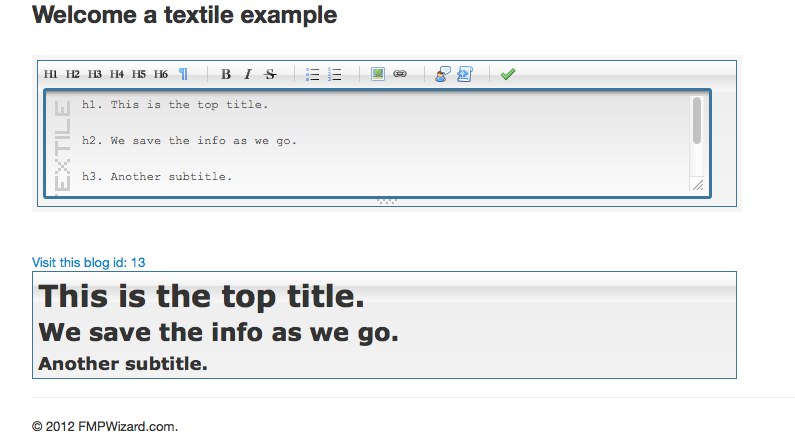
I’m using the jQuery Markitup plugin to convert a textarea element into an editor. This plugin allows you to plug your own textile parser in a few different ways. I went with the option of using a JavaScript function that takes the text entered so far, and using ajaxCall(), I send this data to a Lift method that uses the Lift textile module to convert it into html.
/**
 * Add our parsing JavaScript function to the page
 * Set the onkeyup listener, so that we update the preview box ans save to the database as we type content
 * And finally load textile data from the database if we reloaded the page or click on a link.
 */
def sendToServer = {
  "#sendToServer" #> Script(
    Function("updatePreview", List("paramName"),
      SHtml.ajaxCall(JE.JsRaw("""$("#markItUp").val()"""), (s: String) => {
        val rowID= Sample.save(blogPost, s)
        Sample.parse(s, rowID)
      } )._2.cmd
    )
  ) &
  "#markItUp [onkeyup]" #> Call("updatePreview") &
  "#markItUp *"         #> text.map( Helpers.blankForNull(_))
}


/**
 * Here we parse the textile text and convert it into html
 * We also set the url of the current document, not the SetHtml("link" ... )
 */
def parse(s: String, id: Long): JsCmd = {
  logger.info("We got from the web: %s".format(s))
  val parsed= TextileParser.toHtml(s)
  SetHtml("markItUpResult", parsed) &
  SetHtml("link", SHtml.link(Paths.post.toLoc.currentValue.dmap("1")(_.blogID.is.toString) , ()=> Unit, <span>Visit this blog id: {id}</span> ))
}
I’m letting the JsCmd that is being returned from the ajaxCall set the html in a preview div.
I also have an onkeyup event, so that as you type in the editor, the data is being sent to the Lift server and you get a live preview of your changes.
The last feature I added was to save the changes to a database, as you type along. This may not be what you want on your application, so you can change it to save every x characters, or any rule you want.
/**
 * This is where you can save the data to the database
 */
def save(r: TextTable, s: String): Long ={
  logger.info("We save the data: %s".format(s))
  val entry = r.content(s).saveMe()
  logger.info("The row id is: %s".format(entry.blogID.is))
  entry.blogID.is
}
The code.
All the Scala code is well commented, and can be found here, I did make some small changes to the default Markitup files.
My set.js file looks like this:
myTextileSettings = {
  nameSpace:           "textile", // Useful to prevent multi-instances CSS conflict
  previewParser: function(content) {
    return updatePreview(content);
  },
  onShiftEnter:        {keepDefault:false, replaceWith:'\n\n'},
  markupSet: [
    {name:'Heading 1', key:'1', openWith:'h1(!(([![Class]!]))!). ', placeHolder:'Your title here...' },
    {name:'Heading 2', key:'2', openWith:'h2(!(([![Class]!]))!). ', placeHolder:'Your title here...' },
    {name:'Heading 3', key:'3', openWith:'h3(!(([![Class]!]))!). ', placeHolder:'Your title here...' },
    {name:'Heading 4', key:'4', openWith:'h4(!(([![Class]!]))!). ', placeHolder:'Your title here...' },
    {name:'Heading 5', key:'5', openWith:'h5(!(([![Class]!]))!). ', placeHolder:'Your title here...' },
    {name:'Heading 6', key:'6', openWith:'h6(!(([![Class]!]))!). ', placeHolder:'Your title here...' },
    {name:'Paragraph', key:'P', openWith:'p(!(([![Class]!]))!). '},
    {separator:'---------------' },
    {name:'Bold', key:'B', closeWith:'*', openWith:'*'},
    {name:'Italic', key:'I', closeWith:'_', openWith:'_'},
    {name:'Stroke through', key:'S', closeWith:'-', openWith:'-'},
    {separator:'---------------' },
    {name:'Bulleted list', openWith:'(!(* |!|*)!)'},
    {name:'Numeric list', openWith:'(!(# |!|#)!)'},
    {separator:'---------------' },
    {name:'Picture', replaceWith:'![![Source:!:http://]!]([![Alternative text]!])!'},
    {name:'Link', openWith:'"', closeWith:'([![Title]!])":[![Link:!:http://]!]', placeHolder:'Your text to link here...' },
    {separator:'---------------' },
    {name:'Quotes', openWith:'bq(!(([![Class]!]))!). '},
    {name:'Code', openWith:'@', closeWith:'@'},
    {separator:'---------------' },
    {name:'Preview', call:'updatePreview', className:'preview'}
  ]
}
The two sections to pay attention are:
previewParser: function(content) {
  return updatePreview(content);
},
and
{name:'Preview', call:'updatePreview', className:'preview'}
updatePreview is a JavaScript function we create server side[1], using Lift, that calls an ajaxCall and sends the data to the server, to convert it into html.
[1]See the sendToServer method
Final thoughts.
All in all, this is a simple example of what you can do to integrate a textile editor on your application, there are many features we could add to it, and I hope you find this example useful.
Source code?
You can find the full source code on Github
Make sure to checkout the right branch to run this example, so you would do:
git clone https://github.com/fmpwizard/lift_starter_2.4.git textile
cd textile
git checkout lift_textile
./sbt.sh
>container:start
Thanks
Diego