Go Cortex
Using voice recognition and an ultrasonic sensor
Last week I released a small project I was working on. After I published it, I kept thinking of different ways to use it and how to make it better. I wasn’t too happy with the idea that I had to type my message on the browser, so Cortex could process it. My goal is to have Cortex run on several raspberry pi computers all across my house, and somehow have them all waiting for commands, but I didn’t want to have to manually interact with them.
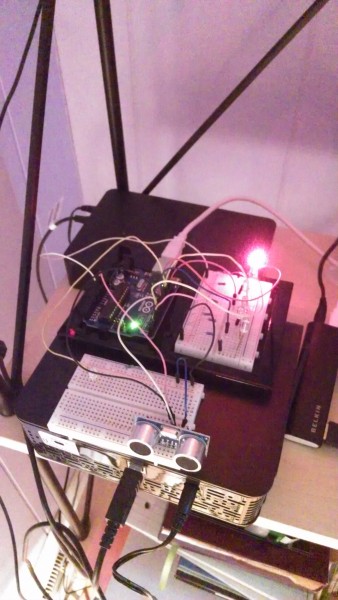
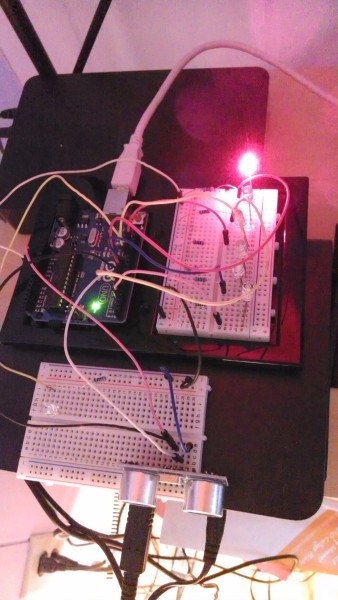
Finding the light.
I knew I didn’t want to record every single word we spoke in my house, send them to the Wit speech endpoint, and have it check if the word we just spoke was a trigger word. That felt very wasteful. I then started to look for a simple way to detect just one word locally on the raspberry pi, this turned out to be pretty involved, the closest would have been to get the EasyVR Shield for the arduino, and have it send a command to the raspberry pi once it heard the trigger command. This wouldn’t be too bad, but I didn’t want to have to wait for shipping, etc before I could continue working on Cortex.
And all of the sudden, it clicked! I had an ultrasonic distance sensor that I played with a few months ago. And I could use this sensor to tell the raspberry pi it was time to start recording a command, which we would then send to Wit, get the processed speech and then tell the arduino board what to do next.
Some internals.
Now my arduino board has two roles, on one hand it has the distance sensor checking to see if there is anything in front of it, and once there is, it sends a little signal to the raspberry pi (or any computer connected using the USB port), so that it knows it is time to record voice.
This allows me to simply wave my hand in front of the sensor, to activate it.
Part of the arduino code for this is here:
int echoPin = 5; // Echo Pin
int trigPin = 6; // Trigger Pin
int LEDPin = 12; // Listening for voice LED

int maximumRange = 200; // Maximum range needed
int minimumRange = 0; // Minimum range needed
long duration, distance; // Duration used to calculate distance
boolean sent = false; // did we just sent a signal to start recording?

...

void setup() {
  Serial.begin(9600);
  ...
  pinMode(trigPin, OUTPUT);
  pinMode(echoPin, INPUT);
  pinMode(LEDPin, OUTPUT); // Use LED indicator
}

...

void ultrasonicSensor() {
  //digitalWrite(LEDPin, LOW);
  /* The following trigPin/echoPin cycle is used to determine the
  distance of the nearest object by bouncing soundwaves off of it. */
  digitalWrite(trigPin, LOW);
  delayMicroseconds(2);

  digitalWrite(trigPin, HIGH);
  delayMicroseconds(10);

  digitalWrite(trigPin, LOW);
  duration = pulseIn(echoPin, HIGH);

  //Calculate the distance (in cm) based on the speed of sound.
  distance = duration/58.2;

  if (distance >= maximumRange || distance <= minimumRange){
    digitalWrite(LEDPin, LOW);
    sent = false;
  } else {
    if (sent == false){
      Serial.println("1");
      sent = true;
      digitalWrite(LEDPin, HIGH);
    }

  }
}
For my needs, I don’t really need to know how far my hand is, as long as there is something, just send the signal.
One the other side, I added a function to the arduino.go file, which runs on a goroutine and listens for the signal.
func readFromArduino(serialPort io.ReadWriteCloser, intentCh chan WitMessage) error {
	if serialPort == nil {
		return nil
	}
	// Read bytes from the serial port.
	buf := make([]byte, 128)
	n, err := s.Read(buf)
	if err != nil {
	    //we get an error if there is no signal from the arduino, so
	    //we wait half a second and then try to listen for a signal again
		time.Sleep(500 * time.Millisecond)
		//log.Println("Calling ArduinoIn() again.")
		ArduinoIn(intentCh)
	}
	log.Printf("From the arduino we got: %v", string(buf[:n]))
	//RecordCommand() runs the sox linux command line to record my voice.
	intent, err := RecordCommand()
	if err != nil {
		log.Printf("got err %v", err)
		return err
	}
    //we send the result from Wit to our go channel
	intentCh <- intent
	return nil
}
func ArduinoIn(intentCh chan WitMessage) {
	for {
		readFromArduino(s, intentCh)
	}
}
This function basically runs in a loop and checks if the arduino wrote anything to the USB port, if it did, it tells the record.go file to start recording my voice command using sox. I changed the sox command a bit so that it only starts recording when there is no silence, and it trims the silence from the end of the file.
Once we have the wav file, I send it to Wit’s speech uri, and I get back the same result as if I sent a text command. And from here on it is the same process, I match the intent, and then I either turn on/off a light using the same arduino board that has the ultrasonic sensor.
In a way, it all starts on the arduino board, and it ends there, when it turns LEDs on or off :)
Final notes.
Adding this new feature was really simple, what took me the longest was to find the right sox parameter and get it to use my usb microphone.
The go code to interact with Wit speech service is pretty straight forward:
//FetchVoiceIntent is like FetchIntent, but sends a wav file
// to the speech endpoint, Wit extracts the text from the sound file
//and then returns a json response with all the info we need.
func FetchVoiceIntent(filePath string) (WitMessage, error) {
	log.Println("reading file")
	body, err := ioutil.ReadFile(filePath)
	if err != nil {
		log.Printf("error: %v reading file", err)
	}
	if len(body) == 0 {
		return WitMessage{}, errors.New("No sound in file")
	}

	url := "https://api.wit.ai/speech"
	client := &http.Client{}
	req, _ := http.NewRequest("POST", url, bytes.NewReader(body))
	req.Header.Add("Authorization", fmt.Sprintf("Bearer %s", witAccessToken))
	req.Header.Add("Content-Type", "audio/wav")
	log.Println("sending request")
	res, err := client.Do(req)
	defer res.Body.Close()

	if err != nil {
		log.Fatalf("Requesting wit's api gave: %v", err)
	}
	if res.StatusCode == 401 {
		log.Fatalln("Access denied, check your wit access token ")
	}

	return processWitResponse(res.Body), nil

}

//processWitResponse gets the raw response from the http request, and
//returns a WitMessage with all the information we got from Wit
func processWitResponse(message io.ReadCloser) WitMessage {
	intent, _ := ioutil.ReadAll(message)

	jsonString := string(intent[:])
	_ = jsonString

	var jsonResponse WitMessage
	err := json.Unmarshal(intent, &jsonResponse)
	if err != nil {
		log.Println("error parsing json: ", err)
	}

	log.Printf("%+v\n\n\n", jsonResponse)
	log.Printf("%+v\n\n\n", jsonString)

	return jsonResponse

}
I love that wheter I use the speech or text api, I still get the same json structure from Wit
Source code.
All the updated code is on the github repo (tag v0.3)
Demo.
I’m working on a video demo so you can see how it all works together. Once I have it ready I’ll add a new post to my blog. But to give you a taste, these are the logs from a test run:
 $ go-cortex --witAccessToken=<token here>
2014/03/09 23:30:12 the port we will use is /dev/ttyACM0

2014/03/09 23:30:12 1- listening for commands.
2014/03/09 23:31:11 From the arduino we got: 1
2014/03/09 23:31:11 about to record
2014/03/09 23:31:11 Please say something...
2014/03/09 23:31:18 reading file
2014/03/09 23:31:18 sending request
2014/03/09 23:31:22 {MsgId:84eb56fb-262f-4975-8b07-cc77687dd7d1 MsgBody:please turn the light one on PC Outcome:{Intent:lights Entities:{Location:{End:0 Start:0 Value: Body: Suggested:false} OnOff:{Value:on} Number:{End:25 Start:22 Value:1 Body:one}} Confidence:0.997}}


2014/03/09 23:31:22 {
  "msg_id" : "84eb56fb-262f-4975-8b07-cc77687dd7d1",
  "msg_body" : "please turn the light one on PC",
  "outcome" : {
    "intent" : "lights",
    "entities" : {
      "on_off" : {
        "value" : "on"
      },
      "number" : {
        "end" : 25,
        "start" : 22,
        "value" : 1,
        "body" : "one"
      }
    },
    "confidence" : 0.997
  }
}

// and here the LED 1 turned on!
Update
here you will find a demo video with diagrams of it all works together
Thank you for reading and don’t hesitate to leave a comment/question.
Diego